Beara Looped Walks
Beara offers some stunning looped walks.
Bullig Bay Loop
Distance: 4km
Minimum Gear: Trekking shoes, raingear, fluid and mobile phone.
Services: Castletownbere (2km)
Terrain: Minor road, laneways, foresty tracks
Theme: Nature / Coastal
Trailhead: Dunboy Woods, Castletownbere.
Directions
Starting Point: The village of Glengarriff is located on the N71, midway between the towns of Bantry and Kenmare. From Glengarriff, take the R572 to Castletownbere – a journey of approximately 35km (1hr). Continue straight through the town and after approximately 2km turn left onto a narrow roadway that passes to the right of the front gates of Dunboy Castle. Follow this roadway for 1km and turn left into Dunboy Woods – the trailhead is located at a car parking area after 800m.
A-B. Starting from the mapboard in the car park follow the purple (and green) arrow along the forestry road back towards the exit. The green arrows are for the shorter Dunboy Woods Loop. After 200m you reach a Y-junction where the Dunboy Woods Loop veers left – but you veer right staying on the forestry road. Continue to follow the purple arrows to reach the exit from the woods where you turn left.
B-C. Now the loop follows a minor roadway for almost 1km to reach a cluster of farmhouses. Enter via the stile/gateway and join an old green laneway which starts to descend toward Pipers Point. At the end of the descent you cross a stile and enter woodland.
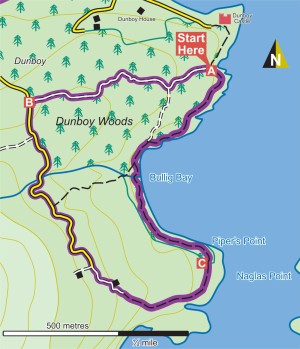
C-A. Continue to follow purple arrows along a woodland track along the edge of Bullig Bay. Enjoy the views of the bay and Bear Island on your right. After 1km you reach a 3-way junction where you rejoin the Dunboy Woods Loop and turn right. Enjoy the last 500m back to the trailhead.
Creha Quay Loop
Distance: 6km
Estimated Time: 1.5hrs – 2hrs
Grade: Easy
Terrain: Laneways and coastal tracks
Minimum Gear: Walking boots, raingear and fluid
Services: Eyeries Village, Castletownbere (8km)
Theme: Coastal
Trailhead: Eyeries, Beara Peninnsula.
Directions
Starting Point: Start from Castletownbere on the R572 on the southern side of the Beara Peninsula. Opposite the car ferry in the town, follow the R571 for 7km to reach Eyeries.
A-B. Starting from the trailhead at Sullivans shop in the heart of the village follow the blue arrow onto the access road towards the beach. You are also on the long-distance Beara Way marked with yellow arrows and the familiar trekking man logo. After approximately 1km the loop (and the way) leaves the roadway at a metal gate and accesses Eyeries Point.
B-C. Follow the sandy roadway to reach the edge of the water and turn right to follow the rugged, rocky shoreline – with high quality scenic views of Coulagh Bay and, in the distance, the coast of Kerry. After 1km you will briefly rejoin a tarred roadway before accessing the shoreline again.
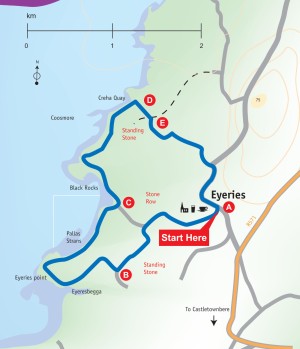
C-D. Now the loop traverses a large number of small farm holdings common to this area before reaching Creha Quay where the longer Coastguard Station Loop (red arrows) and Beara Way (yellow arrows) continue straight onto the coastline again. You turn right here following the blue arrow onto the tarred roadway.
D-E. Continue to follow the tarred roadway for 200m to where the Coastguard Station Loop (red arrows) rejoins it at a laneway on your left. Keep straight ahead here.
E-A. The loop ascends for 500m to enter the cheerfully painted village at its northern end. Turn right and enjoy the remaining 200m through the village and back to the trailhead.
Pulleen Loop
Distance: 5km
Estimated Time: 1.5hrs – 2hrs
Grade: Easy
Terrain: Firm coastal tracks and paths
Minimum Gear: Walking boots, raingear and fluids
Services: Ardgroom (5km), Castletownbere (14km)
Trailhead: Ardgroom
Directions
Starting Point: Start from the village of Ardgroom on the R571 between Lauragh and Eyeries. In the village take the minor road signposted Cuas Pier and Pallas Harbour. Follow this road for approximately 5km to reach Cuas Pier on your right. (The trailhead is signposted from Ardgroom) This loop starts at the pier at Cuas Quay near Bird Point and treats the walker to a range of sites of interest (ruins of farmhouses, sheepfolds and walled holdings) en-route to Dogs Point. At Dogs Point, a small beach and sea cave provides the ideal location for a short break before making the return journey along the coastal section which offer spectacular views of the coastline. Towards the end of the loop the walker is treated to a close-up view of the renowned Coosmore sea cave system – only 250m from the trailhead.
A-B. Starting from the trailhead at Cuas Quay follow the blue arrow onto the tarred road and turn left. After 200m you reach a grassy track onto open ground on your left. Turn left here.
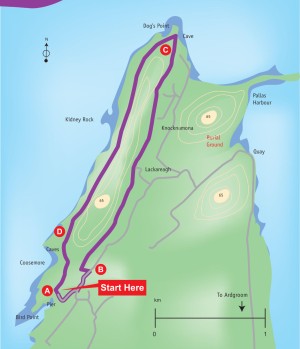
B-C. Follow the grassy track across open ground and join a line of old stone walls. Keeping close to the walls, watch out for a variety of walled holdings, sheep pens and ruins of homesteads as you make your way to Dogs Point.
C-D. From Dogs Point sweep left to join the return section along the coastline (reaching 50m above sea level) and enjoy the breathtaking views over Kenmare Bay. In the distance the coastline of County Kerry is visible. Continue to follow the purple arrows to reach Coosmore Caves – well worth a visit.
D-A. From the caves enjoy the 250m back to the trailhead.
Dursey Island Loop
Dursey Island is located at the tip of the Beara Peninsula. Access to the island is by the only cablecar in Ireland, which takes six people or one large animal at a time! The island has very few inhabitants and no shops, pubs or restaurants – thus offering a unique experience of undisturbed tranquility. Dursey is famous for its magnificent selection of bird species and is a birdwatchers’ heaven. The island has a stark and appealing beauty, with rugged indented coastline, lofty cliffs, open bog and a patchwork of fields divided by dry stone walls and ditches. The landscape is almost treeless since few parts of the island are not exposed to strong winds and salt spray. The landscape is dotted with antiquities ranging from standing stones and early monastery to an impressive signal station from the Napoleonic era. (The cablecar operates only certain periods of the day – please check timetable and allow at least 5hrs for your trip.)
Directions
Starting Point: Start from Castletownbere on the R572 on the southern side of the Bear Peninsula. Follow the R572 for 15km to reach a junction with the R575 near Bealbarnish Gap – turn left here following the signs for Dursey Island. Another 7km will take you to the Cable Car at Ballaghboy.
A-B. Starting from the cablecar, follow the purple arrow along the roadway which travels the southern side of the island. You are also on the long-distance Beara Way marked with yellow arrows and the familiar trekking man logo. After 1km you reach Ballynacallagh the first of three villages on the island. Continue along the roadway.
B-C. Follow the roadway for a further 1km to reach the village of Kilmichael where it is said that monks from Skellig Rock founded the ancient church – now a ruin. Stay on the roadway.
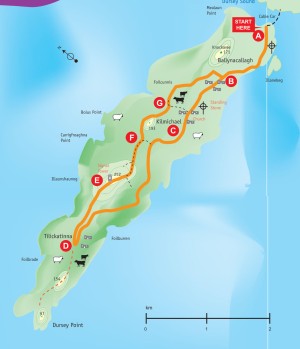
C-D. Continue along the roadway for a further 3kms – and enjoy the spectacular views of the Beara Peninsula on your left. To your right runs a range of steep hills along which you will return – the Signal Station is at the highest of 252m. Within 100m of the end of the roadway, you turn right at a stone wall onto the hillside section. [Note: You may wish to consider the option of continuing from here to Dursey Head, the westernmost point of the island. The out-and-back journey will add 1hr-1hr30mins to your trip.]
D-E. Follow purple and yellow arrows along the well-worn track uphill – a 15min walk will take you to the impressive Signal Tower (ruins). From here you have fine views of the northern side of the island and of the west Cork coastline. Two distinctive islands to the West are named the Bull and Cow! Continue straight from the tower – careful to follow the direction of the waymarker.
E-F. The loop now begins to descend, crossing a stile and joining a ‘green’ road for approximately 500m. As you round a right bend, the loop takes a sharp left turn uphill again onto a grassy track.
E-F. The loop ascends briefly and then descends steeply to reach an old roadway where you turn left and after 200m cross a stile.
F-B-A. The loop follows a series of old green paths to exit via a gateway onto the roadway you traveled out on in the village of Ballynacallagh. Turn left here and enjoy the remaining 1km back to the trailhead.
Rerrin Loop
Distance: 7km
Minimum Gear: Trekking shoes, raingear and fluid.
Services: Rerrin Village, Castletownbere (ferryport)
Terrain: Island roadways, laneways and tracks
Trailhead: Rerrin Village, Bere Island
Directions
Starting Point: The village of Glengarriff is located on the N71 midway between the towns of Bantry and Kenmare. From Glengarriff, take the R572 (signposted Castletownbere) – passing through Adrigole en-route. It is a journey of approximately 35km (1hr). Take a ferry from Castletownbere to Bere Island.
A-B. Facing the mapboard at the trailhead, turn left and follow the purple (and yellow) arrows along the road out of the village. The yellow arrow is for the long-distance Beara Way – this loop overlaps with part of it. After 300m you reach a Y-junction – veer right here following and zig-zag up the hill to reach level ground. After approx 1km pass the military buildings on your left, and pass a number of road junctions to reach the ruins of Lonehort Battery (behind wire fencing) on a right bend. Here you veer left and leave the Beara Way to incoporate a trek around the battery.
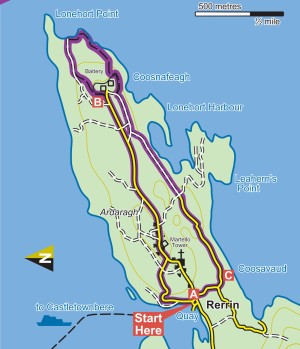
B-C. Follow the purple arrows as the loop descends to the shoreline and then ascends again to give you closeup views of the extensive moat that surrounds the battery, and expansive views of Lonehort Harbour. Rejoining the roadway, the loop turns left and follow the Beara Way along the tarred surface. After 1.5km the Beara Way turns left at a laneway – but you continue straight.
C-A. Almost immediately turn the right bend and follow the purple arrow as the loop veers right at a 3-way junction. Enjoy the last 500m back to the trailhead.
Garinish Loop
Distance: 4km
Grade: Moderate
Minimum Gear: Trekking shoes, raingear, fluid and mobile phone
Services: Castletownbere (10km)
Terrain: Open hillside, minor roadways and laneways
Theme: Coastal
Trailhead: Dursey Island Cablecar, Castletownbere
Directions
Starting Point: The village of Glengarriff is located on the N71, midway between the towns of Bantry and Kenmare. From Glengarriff, take the R572 to Castletownbere – a journey of approximately 35km (1hr). Continue straight through the town along the R572 – following the signposts for Dursey Island Cablecar. The trailhead is located at the boarding point for the cablecar.
A-B. Starting from the car park at the cablecar, cross the stile and follow the purple arrows as the loop sweeps westward around the western end of the Beara Peninsula and ascends quickly to reach it’s highest point of 150m. Note that you are also following the yellow arrows of the long distance O Sullivan Beara Way. Enjoy the fine views along the top before starting the next section which takes you sharply downhill.
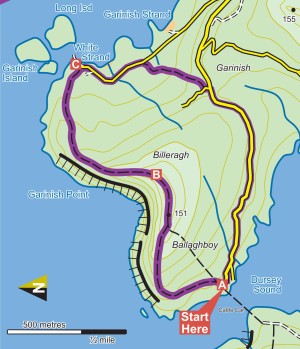
B-C. The loop now descends across open ground toward Garinish Point and gives you close up views of Garanish Island and Long Island before exiting a small gate and reaching the quay at Garinish. Turn right here.
C-D. Follow the roadway for 500m to reach a narrow old laneway on your right. Turn right and follow the purple arrow (and the yellow arrows of the O’Sullivan Beara Way) up the laneway. The laneway climbs to reach a roadway where it turns left and, almost immediately, joins a tarred road. Note that the long-distance Way turns left here – you turn right and enjoy the last 1km back to the trailhead.
North Engine Loop
Trailhead: Heritage Centre, Allihies
Services: Allihies Village
Dist/Time: 7km / 2hrs – 3hrs
Difficulty: Moderate, Average levels of fitness
Terrain: Minor roads, coastline, hillside tracks.
Min. Gear: Hiking boots, raingear, fluid and mobile phone.
Directions
Starting Point: Start from Castletownbere on the R572 on the southern side of the Beara Peninsula. Follow the R572 for 15km to reach a junction with the R575 near Bealbarnish Gap – keep right here following the signs for Allihies. Another 3km will take you to the picturesque village – the trailhead is located at the Heritage Centre.
A-B. Leaving the trailhead at the Heritage Centre, follow the green (and blue and purple) arrows downhill through the village. The blue and purple arrows are for longer loops. After 200m pass a crossroads and 500m later reach a 4-way junction where you turn right onto the ‘beach road’. Note that you have now joined the long-distance Beara Way waymarked with yellow arrows. Follow this road for 600m past the beach and public toilets and join a sandy roadway which takes you across a stile and onto the coastline.
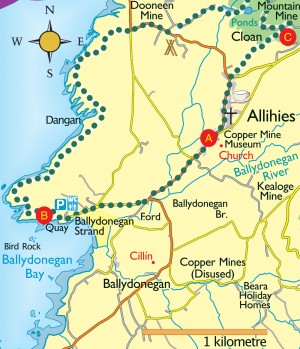
B-C. Follow the green (blue, purple and yellow) arrows as the loop takes you along this superb coastline for 2km. Joining a surfaced road cross straight over and follow this road for 300m to reach a stile where you turn left. Follow the green arrows as the loop takes you by farm buildings and uphill to the disused Mountain Mine area. Joining a surfaced road, turn right and travel downhil for 200m to reach a narrow track on your right. You turn right here – following the green (and yellow) arrow.
C-A. Continue to follow the track downhill for 500m to reach the edge of the village. Enjoy the last 1km back to the trailhead through this picturesque fishing village.
Kealoge Mine Loop
Trailhead: Heritage Centre, Allihies
Services: Allihies Village
Dist/Time: 10km / 3hrs – 4hrs
Difficulty: Moderate, Average levels of fitness
Terrain: Minor roads, coastline, hillside tracks.
Min. Gear: Hiking boots, raingear, fluid, snack, and mobile phone.
Directions
Starting Point: Start from Castletownbere on the R572 on the southern side of the Beara Peninsula. Follow the R572 for 15km to reach a junction with the R575 near Bealbarnish Gap – keep right here following the signs for Allihies. Another 3km will take you to the picturesque village – the trailhead is located at the Heritage Centre.
A-B. Leaving the trailhead at the Heritage Centre, follow the blue (and green and purple) arrows downhill along the surfaced road. The green and purple arrows are for other loops. After 200m pass a crossroads and 500m later reach a 4-way junction where you turn right onto the ‘beach road’. Note that you have now joined the long-distance Beara Way – waymarked with yellow arrows. Follow this road for 600m past the beach and public toilets and join a sandy roadway which takes you across a stile and onto the coastline.
B-C. Follow the blue (green, purple and yellow) arrows as the loop takes you along this superb coastline for 2km. Joining a surfaced road cross straight over and follow this road for 300m to reach a stile where you turn left. Follow the blue arrows as the loop takes you by farm buildings and uphill to a disused mine area. Joining a surfaced road, turn right and travel downhill for 200m to reach a narrow track on your right. The green loop turns right here – but you continue straight on following the blue (and purple) arrows.
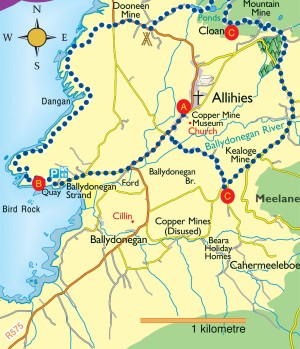
C-D. Follow the roadway for 300m to reach a stile on your left. Cross this stile and follow the blue arrows past old mining buildings to join a minor roadway. After 500m you join a surfaced road and turn left. Follow this road for more than 1km to a junction where you rejoin the Beara Way (yellow arrows). Continue to follow roadway past Kealoge Mine (on your right) to reach a narrow laneway on your right where the purple loop goes straight – but you turn right following the blue (and yellow) arrows.
D-A. The surfaced laneway soon becomes a grassy laneway as it descends. Near the edge of the village you join the surfaced road on which you started out – turn right and enjoy the last 200m back to the trailhead.
Ballydonegan Loop
Trailhead: Heritage Centre, Allihies
Services: Allihies Village
Dist/Time: 18km / 4hrs – 5hrs
Difficulty: Hard, Above average levels of fitness
Terrain: Minor roads, coastline, hillside tracks.
Min. Gear: Hiking boots, raingear, fluid, snack, and mobile phone.
Directions
Starting Point: Start from Castletownbere on the R572 on the southern side of the Beara Peninsula. Follow the R572 for 15km to reach a junction with the R575 near Bealbarnish Gap – keep right here following the signs for Allihies. Another 3km will take you to the picturesque village – the trailhead is located at the Heritage Centre.
A-B. Leaving the trailhead at the Heritage Centre, follow the purple (and green and blue) arrows downhill along the surfaced road. The green and blue arrows are for shorter loops. After 200m pass a crossroads and 500m later reach a 4-way junction where you turn right onto the ‘beach road’. Note that you have now joined the long-distance Beara Way – waymarked with yellow arrows. Follow this road for 600m past the beach and public toilets and join a sandy roadway which takes you across a stile and onto the coastline.
B-C. Follow the purple (green, blue and yellow) arrows as the loop takes you along this superb coastline for 2km. Joining a surfaced road cross straight over and follow this road for 300m to reach a stile where you turn left. Follow the purple arrows as the loop takes you by farm buildings and uphill to a disused mine area. Joining a surfaced road, turn right and travel downhill for 200m to reach a narrow track on your right. The green loop turns right here – but you continue straight on following the purple (and blue) arrows.
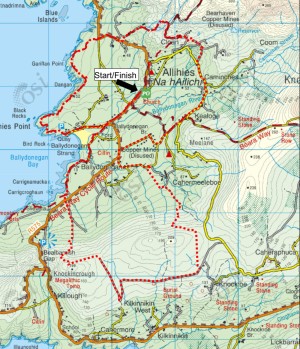
C-D. Follow the roadway for 300m to reach a stile on your left. Cross this stile and follow the purple arrows past old mining buildings to join a minor roadway. After 500m you join a surfaced road and turn left. Follow this road for more than 1km to a junction where you rejoin the Beara Way (yellow arrows). Continue to follow roadway past Kealoge Mine (on your right) to reach a narrow laneway on your right where the blue loop turns right following the Beara Way (yellow arrows). You continue straight ahead.
D-E. Continue to follow the surfaced roadway for approximately 500m to reach a roadway on your left into Beara Holiday Homes. Turn left here, but almost immediately turn right and cross a stile into a field. After 300m you exit the field and join an old laneway – turn left and follow the laneway as it takes you through a forested section and follows a wire fence over a hill and descends to join a surfaced roadway at Knockroe. Turning right the loop descends gently to the townland of Kilkinnikin where it turns sharp right and joins a sandy laneway and ascends again. After the laneway ends the loop joins a wire fence and crosses hillside westward toward Knockincrough. Here the loop turns north again and starts a descent on a sandy laneway to reach the R575 at Ballydonegan.
E-A. The loop just crosses the main road here and rejoins the Beara Way (yellow arrows) and turns right. Shortly afterwards you join an old laneway and turn left following the shoreline of Ballydonegan Bay. After Bayyydonegan Strand the loop joins the 4-way junction mentioned at A above. This time go straight on and enjoy the last 500m back to the trailhead.
